Web3 has been trending since the start of 2022, much like NFTs were exploding last year. Still, the notion of building decentralized apps for mainstream use cases like Facebook, Instagram, and Google has been a long ambition of the crypto community. However, while some blockchain businesses have already developed some DApps, the Web3 industry has only recently begun to gain popularity. In this article, we will be creating an Adoption Tracking System for a Pet Shop on Ethereum from scratch.
Table of Contents
Summary (TL;DR)
- Web3 has been trending since the start of 2022, much like NFTs were exploding last year.
- Prior experience in Solidity and Blockchain Development tools like Ganache, Truffle etc., is not required.
- A DApp is a software application that operates on a distributed network.
- We need to install VS Code, NodeJS, Git, Truffle and Ganache.
- After that, we will set up our development environment using the Truffle Box, i.e. pet-shop.
- The next step is to create a smart contract using solidity.
- We will compile the smart contract using the truffle compile command and then migrate it using the truffle migrate command.
- We will create a TestAdoption.sol file to test our smart contract along with the truffle test command.
- We will create a user interface with Web3.js and some existing code in the truffle box.
- Finally, we will interact with our DApp using MetaMask and Ganache.
Problem Statement
Let’s take the example of Pete. Pete is an owner of a Pet Shop in New Delhi, India.
As we can see, Blockchain Technology and Cryptocurrency are gaining mainstream acceptance. On 1st February 2022, Finance Minister Nirmala Sitharaman announced that the Reserve Bank of India would issue a Digital Rupee using Blockchain Technology starting 2022-23. This is a positive step in the direction of crypto adoption. Now India has recognized Blockchain Technology.
So Pete is also interested in using Blockchain Technology. He wants to use Blockchain Technology for his shop. After doing some research on his own, Pete is Fascinated with Ethereum Blockchain and the idea of Smart Contracts. He is interested in using it to manage pet adoptions more efficiently. His business can accommodate up to 16 pets at any given moment. He already has a pet database ready. Pete wants someone to create a DApp for him.
The goal of the DApp is to connect an Ethereum Address with a pet to be adopted.
This is an example of what a typical problem statement looks like in a Blockchain Business. Now, let’s move to the next step.
Prerequisites
This article is intended for people who have a basic understanding of Ethereum and Smart Contracts. If you have no prior knowledge about Ethereum, Start from here.
Some Coding experience of HTML and JavaScript will help in understanding coding logic easily. If someone is new to DApps or starting his Web Development journey, they can easily follow this article. Prior experience in Solidity and Blockchain Development tools like Ganache, Truffle etc., is not required. However, we will explain each step as we move forward.
This article will be helpful for every newbie, and we will build a DApp step by step. Now, let’s move to the next step and understand what a DApp is.
What is a DApp?
A Decentralized Application is a software application that operates on a distributed network. It is not hosted on a Centralized Server but on a Decentralized Peer-to-Peer Network such as IPFS. To deploy or interact with a DApp, there is no need to reveal any real-world identification.
DApp = FrontEnd + Smart Contract BackEnd
BackEnd Code is written mainly in Solidity (or Vyper). However, there is no specific language for FrontEnd Code. Now, let’s move to the next step and understand how DApps work.
Also read, What are Dapps? (An ultimate guide)
How DApps Work?
In the diagram below, we can see how a typical DApp works. Now let’s deep-dive into this diagram to understand it in a better way.
- Client Browser: It is a Normal Browser written in HTML, CSS and JS.
- Web3.js: It is a collection of libraries that allow us to interact with a local or remote Ethereum node using HTTP, IPC or WebSocket.
- Web3 Provider: Ethereum network contains nodes, and all nodes share the identical copy of data. Setting a web3 provider in web3.js tells our code which node we will read and write data from. We are using Metamask in our DApp to inject its web3 provider in the browser.
- Ethereum Virtual Machine (EVM): Each Ethereum node in the network has its EVM implementation and is responsible for running the same Smart Contract instructions over the network.

Installation of Dependencies
There are a few technical requirements before we start creating DApp. In this section, we will install all required dependencies.
1. Installation of VS Code
Firstly, we need an IDE, i.e. Integrated Development Environment. An IDE allows programmers to simplify the process of building a computer program. It boosts a programmer’s productivity by merging typical software development tasks such as editing source code, building executables, and debugging in a single place.
We will use Visual Studio Code in our article. It is a lightweight source code editor ideal for day-to-day use with features like syntax highlighting, bracket-matching, auto-indentation, box-selection, snippets, etc. It blends the ease of use of a source code editor with advanced developer features such as IntelliSense code completion and debugging. It is available for macOS, Linux, and Windows.
To download VS Code, Follow the step-by-step guide by clicking here.
2. Installation of NodeJS and npm
Secondly, we need a runtime environment. We will use NodeJS and npm. npm comes with NodeJS.
Node.js is a JavaScript runtime environment that is open source and cross-platform. It is a widely used tool for almost any project. It’s a lightweight, scalable, and open-source language platform that makes it simple to build apps at the corporate level. Npm contains packages that we utilize in our apps to speed up and improve the development process.
To download NodeJS, Follow the step-by-step guide by clicking here.
3. Installation of Git
Thirdly, we need Git. It is a free and open-source distributed version control system designed to manage everything with speed and efficiency. It maintains the changes we make to files, so we have a record of what has been done.
To download Git, Click here.
4. Installation of Truffle
Fourthly, we need Truffle. It is a world-class development environment, testing framework, and asset pipeline for blockchains based on the Ethereum Virtual Machine (EVM).
To download Truffle, Follow this step-by-step guide.
- Step 1: Open VS Code.
- Step 2: Click on Terminal.

- Step 3: Click on New Terminal.

- Step 4: Paste this command on the terminal.
npm install -g truffle
- Step 5: To verify that Truffle is installed properly, Paste this command on the terminal.
truffle version
5. Installation of Ganache
Lastly, we need Ganache. It is a local blockchain for rapid Ethereum and Corda application development. We can use Ganache across the entire development cycle: development, deployment, and testing DApps in a safe and secure environment. All versions of Ganache are available for Windows, Mac, and Linux.
Ganache is available in two modes: GUI and CLI. Ganache UI is a desktop application supporting both Ethereum and Corda. Ganache CLI is only available for Ethereum development.
In this article, we will use Ganache CLI because it is simple and easy to use. To download Ganache CLI, Follow this step-by-step guide.
- Step 1: Open VS Code.
- Step 2: Click on Terminal.

- Step 3: Click on New Terminal.

- Step 4: Paste this command on the terminal.
npm install ganache --global
- Step 5: To start Ganache, Paste this command on the terminal.
ganache
Now we have installed all the dependencies. The next step is to set up and optimize our Development Environment.
Setting up the Development Environment
In this section, we will set up our development environment. To set up the development environment, Follow this step-by-step guide.
- Step 1: Go to VS Code and Create a Folder pet-shop-tutorial.

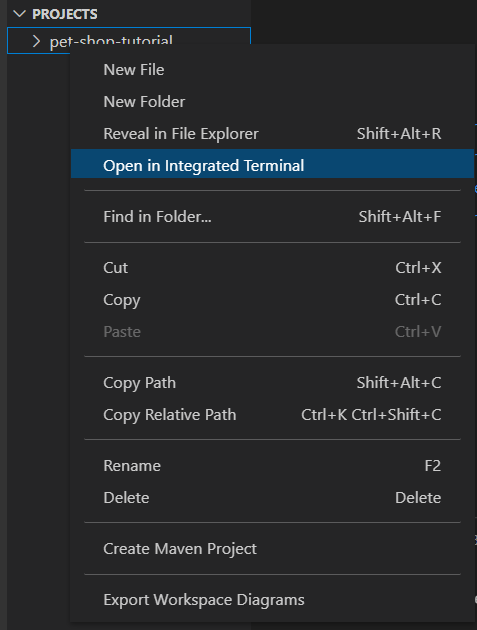
- Step 2: Now Right Click on pet-shop-tutorial and Click on Open in Integrated Terminal.

The Truffle team has created Truffle Boxes. These are the boilerplates that contain helpful modules, solidity contracts & libraries, front-end views and much more.
- Step 3: In this article, we will use a Truffle Box, i.e. pet-shop, which includes the basic project structure and code for the user interface. Paste this command on the terminal.
truffle unbox pet-shop
After running the above command, the command will download the files we can see in the above image.
- Alternative Method for Step 3: If someone wishes to create the user interface from scratch but wants a truffle boilerplate. Paste this command on the terminal.
truffle init- Step 4: We will install the VS Code extension Solidity by Juan Blanco to write Solidity code in VS Code. Open VS Code and Go to Extensions in the right sidebar and Click on it. Search for Solidity and Click on Extension, whose author is Juan Blanco. Click Install.

Now our development environment is successfully created. The next step is to create a smart contract.
Creation of Smart Contract
In this section, we will create a smart contract for our DApp. This logic will act as backend and storage for our DApp. To create a smart contract, Follow this step-by-step guide.
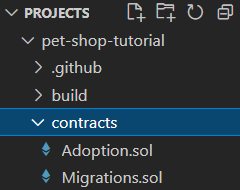
Step 1: Go to contracts directory in the pet-shop-tutorial folder
This directory will contain our smart contract code written in solidity. Now Create a new file Adoption.sol.
Step 2: Now, we will start writing our solidity code
Paste this code in the Adoption.sol file.
// SPDX-License-Identifier: GPL-3.0
pragma solidity >=0.4.0 <0.9.0;
contract Adoption {
}
Now, we will understand the significance of the code written above.
- SPDX-License-Identifier: GPL-3.0 : Solidity version 0.6.8 has introduced SPDX license identifiers, allowing developers to define the license the contract uses. Developers should add this at the top. If this is missing from the contract file, the compiler will display a warning. Also, if the contract file has multiple license identifiers, the compiler will show an error.
- pragma solidity >=0.4.0 <0.9.0; : This command tells the compiler that the source code is written for Solidity versions 0.4.0 to 0.9.0. The pragma keyword is used to enable compiler features and checks.
- contract Adoption {} : This command specifies the collection of code and data at a specific address on the Ethereum blockchain.
Step 3: Now, we will declare a variable for our smart contract
Paste this code after contract Adoption { in the Adoption.sol file.
address[16] public adopters;Now, we will understand the significance of the code written above.
- address[16] : This statement is an array of Ethereum addresses. Arrays contain one type and can have a fixed or variable length. In this case, the type is address, and the length is 16.
- public : Public functions are part of the contract interface and can be called externally or internally. For public state variables, an automatic getter function is generated.
- adopters : This statement is a variable that is a container to store value.
Step 4: Now, we will add the adopt() function to our smart contract
We need a function to allow users to make their adoption requests. So we will create a adopt() function. Paste this code after the variable declaration in the Adoption.sol file.
// Adopting a pet
    function adopt(uint256 petId) public returns (uint256) {
        require(petId >= 0 && petId <= 15);
        adopters[petId] = msg.sender;
        return petId;
    }
Now, we will understand the significance of the code written above.
- function adopt(uint256 petId) public returns (uint256) {} : We have to specify the function parameters and output types in Solidity. In this case, we take petId input as an integer and return it as an integer. To know more about Functions in Solidity, Click here.
- require(petId >= 0 && petId <= 15); : We are using require() function to check whether petID is within the range. As arrays are indexed from 0 in Solidity, we are taking the petID value between 0 and 15.
- adopters[petId] = msg.sender; : If the ID falls within the range, the function adds the address that made the call to the adopters array. msg.sender denotes the address of the person or smart contract that called this function.
- return petId; : We are returning the petId as output.
Step 5: Now, we will add the getAdopters() function to our smart contract
We need a function to retrieve the adopters. This function should update all pet adoption statuses. So we will create a getAdopters() function, which returns the entire array. Paste this code after the adopt() function in the Adoption.sol file.
// Retrieving the adopters
    function getAdopters() public view returns (address[16] memory) {
        return adopters;
    }
Now, we will understand the significance of the code written above.
- function getAdopters() public view returns (address[16] memory) {} : Explanation of function declaration is similar to Step 4.The view keyword indicates that the function will not change the contract’s state. memory specifies the variable’s data location.
- return adopters : Since we have already declared the adopters variable in Step 3. We can return it.
Step 6: Here is our complete solidity code
// SPDX-License-Identifier: GPL-3.0

pragma solidity >=0.4.0 <0.9.0;

contract Adoption {
    address[16] public adopters;

    // Adopting a pet
    function adopt(uint256 petId) public returns (uint256) {
        require(petId >= 0 && petId <= 15);
        adopters[petId] = msg.sender;
        return petId;
    }

    // Retrieving the adopters
    function getAdopters() public view returns (address[16] memory) {
        return adopters;
    }
}
Now our smart contract is successfully created. The next step is to compile the smart contract.
Compilation of Smart Contract
In this section, we will compile our smart contract. Since Solidity is a compiled language. Therefore, we must compile it to bytecode before the EVM can execute it. To compile the smart contract, Follow this step by step guide.
- Step 1: Go to VS Code pet-shop-tutorial folder. Now Right Click on it and Click on Open in Integrated Terminal.
- Step 2: Paste this command on the terminal. This command will compile all the contracts in the contracts directory.
truffle compileAfter running the above command, we will see the output as shown in the below image.

Now our smart contract is successfully compiled. The next step is to migrate the smart contract.
Migration of Smart Contract
In this section, we will migrate our smart contract. Migrations are JavaScript files that help deploy contracts to the Ethereum network. To migrate the smart contract, Follow this step by step guide.
Step 1: Go to the migrations directory in the pet-shop-tutorial folder.
We will see a JavaScript file is already present, i.e. 1 initial migration.js. This file handles the deployment of the Migrations.sol smart contract. We need a similar file for our Adoption.sol contract. We will create a new file, i.e. 2_deploy_contracts.js, similar to our 1_initial_migration.js. The coding part will be similar in both files. The only changes will be the require() and deploy() functions. Here we will write Adoption in place of Migrations. Paste this code in the 2_deploy_contracts.js file.
var Adoption = artifacts.require("Adoption");

module.exports = function(deployer) {
  deployer.deploy(Adoption);
};
Step 2: Now it’s time to run Ganache.
We need to have a blockchain operational before migrating our smart contract to it. As discussed above, we’ll be using Ganache CLI. Also now we will need two terminals. The first one will be for Ganache Commands, and the Second will be for truffle commands. So we have to open our integrated terminals two times. To start Ganache, Paste this command on the terminal.
ganache
This command will create a blockchain that will operate locally on port 8545.

Step 3: Now, we will change the Port Number
The main Difference between Ganache GUI and CLI is that Ganache GUI runs on port 7545, but Ganache CLI runs on port 8545. So now we will change the port number in the truffle-config.js file, which is present at the bottom of the pet-shop-tutorial folder.

Step 4: Now, it’s time to migrate the smart contract to the blockchain
Paste this command on the terminal. This command will migrate all the contracts in the migrations directory.
truffle migrateAfter running the above command, we will see the output as shown in the below image.


Now, if we go back to Ganache, we can see that the state of the blockchain has changed. The blockchain now shows block number 4. Previously, it was 0.

Now our smart contract has successfully migrated. The next step is to test the smart contract.
Testing the Smart Contract
In this section, we will test our smart contract. Testing a smart contract is essential because one bug can cost millions of dollars. To test the smart contract, Follow this step by step guide.
Step 1: Go to the test directory in the pet-shop-tutorial folder
This directory will contain code written in solidity for smart contract testing. Now Create a new file TestAdoption.sol. Paste this code in the TestAdoption.sol file.
// SPDX-License-Identifier: GPL-3.0

pragma solidity >=0.4.0 <0.9.0;

import "truffle/Assert.sol";
import "truffle/DeployedAddresses.sol";
import "../contracts/Adoption.sol";

contract TestAdoption {
  Adoption adoption = Adoption(DeployedAddresses.Adoption());

  uint expectedPetId = 8;

  address expectedAdopter = address(this);
}
Now, we will understand the significance of the code written above.
- import “truffle/Assert.sol”; : We are importing Assert.sol from the global truffle directory. It gives us various assertion checks to use in our tests.
- import “truffle/DeployedAddresses.sol”; : We are importing DeployedAddresses.sol from the global truffle directory. Truffle will deploy a fresh instance of the contract being tested to the blockchain when running tests. This file obtains the address of the deployed contract.
- import “../contracts/Adoption.sol”; : We are importing Adoption.sol from the contracts directory as this is the smart contract on which we want to perform tests.
- Adoption adoption = Adoption(DeployedAddresses.Adoption()); : This code contains the smart contract’s address to be tested, i.e. Adoption contract.
- uint expectedPetId = 8; : This variable contains the expected pet Id, which the TestAdoption contract will use for testing.
- address expectedAdopter = address(this); : We set the expected adopter address to this, which retrieves the current contract’s address because the TestAdoption contract will be sending the transaction to the Adoption contract.
Step 2: Now, we will test the adopt() function
Paste this code after the declaration of expectedPetId in the TestAdoption.sol file.
// Testing the adopt() function
function testUserCanAdoptPet() public {
  uint returnedId = adoption.adopt(expectedPetId);

  Assert.equal(returnedId, expectedPetId, "Adoption of the expected pet should match what is returned.");
}
Now, we will understand the significance of the code written above.
- uint returnedId = adoption.adopt(expectedPetId); : We call the previously declared smart contract, i.e. Adoption contract with the ID expectedPetId.
- Assert.equal(returnedId, expectedPetId, “Adoption of the expected pet should match what is returned.”); : We pass the actual value, i.e. returnedId, the expected value, i.e. expectedPetId and a failure message that gets printed if the test fails to Assert.equal() function.
Step 3: Now, we will test the retrieval of a single pet’s owner
Paste this code after the testUserCanAdoptPet() function in the TestAdoption.sol file.
// Testing retrieval of a single pet's owner
function testGetAdopterAddressByPetId() public {
  address adopter = adoption.adopters(expectedPetId);

  Assert.equal(adopter, expectedAdopter, "Owner of the expected pet should be this contract");
}
Now, we will understand the significance of the code written above.
- address adopter = adoption.adopters(expectedPetId); We are getting the adopter address stored by the Adoption contract after passing expectedPetId.
- Assert.equal(adopter, expectedAdopter, “Owner of the expected pet should be this contract”); We are passing the actual value, expected value, and a failure message that gets printed if the test results in failure to Assert.equal() function.
Step 4: Now, we will test the retrieval of all pet owners
Paste this code after the testGetAdopterAddressByPetId() function in the TestAdoption.sol file.
// Testing retrieval of all pet owners
function testGetAdopterAddressByPetIdInArray() public {
  address[16] memory adopters = adoption.getAdopters();

  Assert.equal(adopters[expectedPetId], expectedAdopter, "Owner of the expected pet should be this contract");
}
Now, we will understand the significance of the code written above.
- address[16] memory adopters = adoption.getAdopters(); : We are storing adopters in memory rather than contract’s storage.
- Assert.equal(adopters[expectedPetId], expectedAdopter, “Owner of the expected pet should be this contract”); : We are passing the actual value, expected value, and a failure message that gets printed if the test results in failure to Assert.equal() function.
Step 5: Here is our Complete Solidity Code
// SPDX-License-Identifier: GPL-3.0

pragma solidity >=0.4.0 <0.9.0;

import "truffle/Assert.sol";
import "truffle/DeployedAddresses.sol";
import "../contracts/Adoption.sol";

contract TestAdoption {
    // The address of the adoption contract to be tested
    Adoption adoption = Adoption(DeployedAddresses.Adoption());

    // The id of the pet that will be used for testing
    uint256 expectedPetId = 8;

    // Testing the adopt() function
    function testUserCanAdoptPet() public {
        uint256 returnedId = adoption.adopt(expectedPetId);

        Assert.equal(returnedId, expectedPetId, "Adoption of the expected pet should match what is returned.");
    }

    // Testing retrieval of a single pet's owner
    function testGetAdopterAddressByPetId() public {
        address adopter = adoption.adopters(expectedPetId);

        Assert.equal(adopter, expectedAdopter, "Owner of the expected pet should be this contract");
    }

    // Testing retrieval of all pet owners
    function testGetAdopterAddressByPetIdInArray() public {
        // Store adopters in memory rather than contract's storage
        address[16] memory adopters = adoption.getAdopters();

        Assert.equal(adopters[expectedPetId], expectedAdopter, "Owner of the expected pet should be this contract"
        );
    }

    // The expected owner of adopted pet is this contract
    address expectedAdopter = address(this);
}
Step 6: Now, it’s time to test the smart contract
Paste this command on the terminal.
truffle testAfter running the above command, we will see the output as shown in the below image.
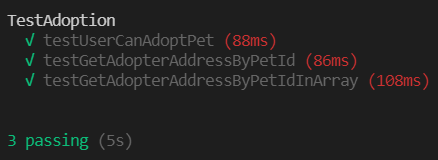
Now our smart contract is successfully tested. The next step is to create a frontend interface for our DApp.
Creation of a User Interface for Smart Contract
In this section, we will create a user interface. The code for the DApp’s front-end is also in the pet-shop Truffle Box. It is present inside in the src directory. We will only add those functions which are unique to Ethereum. To create a user interface for smart contract, Follow this step by step guide.
Step 1: Instantiation of web3
Go to app.js file in the test directory of the pet-shop-tutorial folder. Now, remove the multi-line comment from the initWeb3() function and paste the code below.
// {Part 1}
if (window.ethereum) {
  App.web3Provider = window.ethereum;
  try {
    // Request account access
    await window.ethereum.request({ method: "eth_requestAccounts" });;
  } catch (error) {
    // User denied account access...
    console.error("User denied account access")
  }
}
// {Part 2}
else if (window.web3) {
  App.web3Provider = window.web3.currentProvider;
}
// {Part 3}
else {
  App.web3Provider = new Web3.providers.HttpProvider('http://localhost:8545');
}
web3 = new Web3(App.web3Provider);
Now, we will understand the significance of the code written above.
- Part 1 i.e. if condition : We are checking if we use DApp browsers where an ethereum provider is injected into the window object. We use it to create our web3 object, but we also need to request access to the accounts explicitly with ethereum.enable().
- Part 2 i.e. else if condition : If the ethereum object does not exist, we check for an injected web3 instance. If it exists, this indicates that we are using an older DApp browser. So we get its provider and use it to create our web3 object.
- Part 3 i.e. else condition : If there is no injected web3 instance, we create our web3 object using our local provider.
Step 2: Instantiation of contract
We need to instantiate our smart contract, so web3 understands where to find it and how it works. Now, remove the multi-line comment from the initContract() function and paste the code below.
$.getJSON('Adoption.json', function(data) {
  // Get the necessary contract artifact file and instantiate it with @truffle/contract
  var AdoptionArtifact = data;
  App.contracts.Adoption = TruffleContract(AdoptionArtifact);

  // Set the provider for our contract
  App.contracts.Adoption.setProvider(App.web3Provider);

  // Use our contract to retrieve and mark the adopted pets
  return App.markAdopted();
});
Now, we will understand the significance of the code written above.
- var AdoptionArtifact = data; : We are retrieving the Artifact file for our smart contract.
- App.contracts.Adoption = TruffleContract(AdoptionArtifact); : We will now pass the Artifact file to TruffleContract(), which creates an instance of the contract to interact with.
- App.contracts.Adoption.setProvider(App.web3Provider); : We will set the contract’s web3 provider using the App.web3Provider value we stored earlier when setting up web3.
- return App.markAdopted(); : We will be calling the markAdopted() function if pets are already adopted from a previous visit.
Step 3: Getting the Adopted Pets and Updation of UI
Now, remove the multi-line comment from the markAdopted() function and paste the code below.
// Part 1
var adoptionInstance;

App.contracts.Adoption.deployed().then(function(instance) {
  adoptionInstance = instance;

  return adoptionInstance.getAdopters.call();
// Part 2
}).then(function(adopters) {
  for (i = 0; i < adopters.length; i++) {
    if (adopters[i] !== '0x0000000000000000000000000000000000000000') {
      $('.panel-pet').eq(i).find('button').text('Success').attr('disabled', true);
    }
  }
}).catch(function(err) {
  console.log(err.message);
});
Now, we will understand the significance of the code written above.
- Part 1 : We will declare the variable adoptionInstance outside the smart contract calls to access the instance easily after retrieving it for the first time. After this, we will use the call() function, which allows us to read data from the blockchain without a transaction.
- Part 2: After calling the getAdopters() function, we will use the for loop to check if an address is stored for each pet. Lastly, we check for all possible errors.
Step 4: Handling the adopt() function
Now, remove the multi-line comment from the handleAdopt function and paste the code below.
// Part 1
var adoptionInstance;

web3.eth.getAccounts(function(error, accounts) {
  if (error) {
    console.log(error);
  }

  var account = accounts[0];

  App.contracts.Adoption.deployed().then(function(instance) {
    adoptionInstance = instance;

    // Execute adopt as a transaction by sending account
    return adoptionInstance.adopt(petId, {from: account});
  }).then(function(result) {
// Part 2
    return App.markAdopted();
  }).catch(function(err) {
    console.log(err.message);
  });
});
Now, we will understand the significance of the code written above.
- Part 1 : We will use web3 to retrieve the user accounts. After the error check, we then select the first account in the callback. After that, we will get the deployed contract and store the instance in adoptionInstance. Then we will send a transaction instead of a call. Transactions require a from address and have an associated cost. We send the transaction by executing the adopt() function with petID and an object containing the account address, i.e. account.
- Part 2 : The transaction object is the result of sending a transaction. If no problems occur, we execute our markAdopted() function to synchronize the UI with our freshly stored data.
Step 5: Here is the complete code of the app.js file
App = {
  web3Provider: null,
  contracts: {},

  init: async function() {
    // Load pets.
    $.getJSON('../pets.json', function(data) {
      var petsRow = $('#petsRow');
      var petTemplate = $('#petTemplate');

      for (i = 0; i < data.length; i ++) {
        petTemplate.find('.panel-title').text(data[i].name);
        petTemplate.find('img').attr('src', data[i].picture);
        petTemplate.find('.pet-breed').text(data[i].breed);
        petTemplate.find('.pet-age').text(data[i].age);
        petTemplate.find('.pet-location').text(data[i].location);
        petTemplate.find('.btn-adopt').attr('data-id', data[i].id);

        petsRow.append(petTemplate.html());
      }
    });

    return await App.initWeb3();
  },

  initWeb3: async function() {
    // Modern dapp browsers...
if (window.ethereum) {
  App.web3Provider = window.ethereum;
  try {
    // Request account access
    await window.ethereum.request({ method: "eth_requestAccounts" });;
  } catch (error) {
    // User denied account access...
    console.error("User denied account access")
  }
}
// Legacy dapp browsers...
else if (window.web3) {
  App.web3Provider = window.web3.currentProvider;
}
// If no injected web3 instance is detected, fall back to Ganache
else {
  App.web3Provider = new Web3.providers.HttpProvider('http://localhost:7545');
}
web3 = new Web3(App.web3Provider);


    return App.initContract();
  },

  initContract: function() {
    $.getJSON('Adoption.json', function(data) {
      // Get the necessary contract artifact file and instantiate it with @truffle/contract
      var AdoptionArtifact = data;
      App.contracts.Adoption = TruffleContract(AdoptionArtifact);

      // Set the provider for our contract
      App.contracts.Adoption.setProvider(App.web3Provider);

      // Use our contract to retrieve and mark the adopted pets
      return App.markAdopted();
    });


    return App.bindEvents();
  },

  bindEvents: function() {
    $(document).on('click', '.btn-adopt', App.handleAdopt);
  },

  markAdopted: function() {
    var adoptionInstance;

App.contracts.Adoption.deployed().then(function(instance) {
  adoptionInstance = instance;

  return adoptionInstance.getAdopters.call();
}).then(function(adopters) {
  for (i = 0; i < adopters.length; i++) {
    if (adopters[i] !== '0x0000000000000000000000000000000000000000') {
      $('.panel-pet').eq(i).find('button').text('Success').attr('disabled', true);
    }
  }
}).catch(function(err) {
  console.log(err.message);
});

  },

  handleAdopt: function(event) {
    event.preventDefault();

    var petId = parseInt($(event.target).data('id'));

    var adoptionInstance;

web3.eth.getAccounts(function(error, accounts) {
  if (error) {
    console.log(error);
  }

  var account = accounts[0];

  App.contracts.Adoption.deployed().then(function(instance) {
    adoptionInstance = instance;

    // Execute adopt as a transaction by sending account
    return adoptionInstance.adopt(petId, {from: account});
  }).then(function(result) {
    return App.markAdopted();
  }).catch(function(err) {
    console.log(err.message);
  });
});

  }

};

$(function() {
  $(window).load(function() {
    App.init();
  });
});
Now our user interface is successfully created. The next step is to interact with DApp.
Interaction with DApp
This is the final step. In this section, we will interact with DApp. To interact with the DApp, Follow this step by step guide.
Step 1: Installation of MetaMask
MetaMask is a crypto wallet and Web3 gateway to blockchain DApps. It is currently available as a browser extension and a mobile app on Android and iOS devices. To download MetaMask, Follow this step by step guide.
Step 2: Adding Ganache to MetaMask
Now, we will connect MetaMask to the blockchain created by Ganache CLI. Click on the icon which shows Ethereum Mainnet. Then, we will see an option to Add Network. Click on Add Network Button.
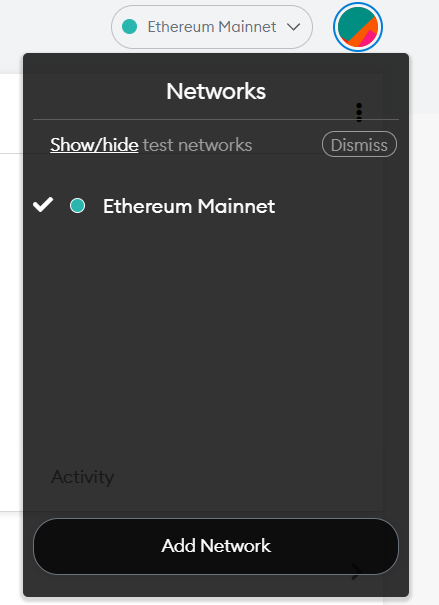
Now, we will add the following parameters given below and click Save.
- Name: Ganache
- RPC-URL: http://127.0.0.1:8545
- Chain-ID: 1337
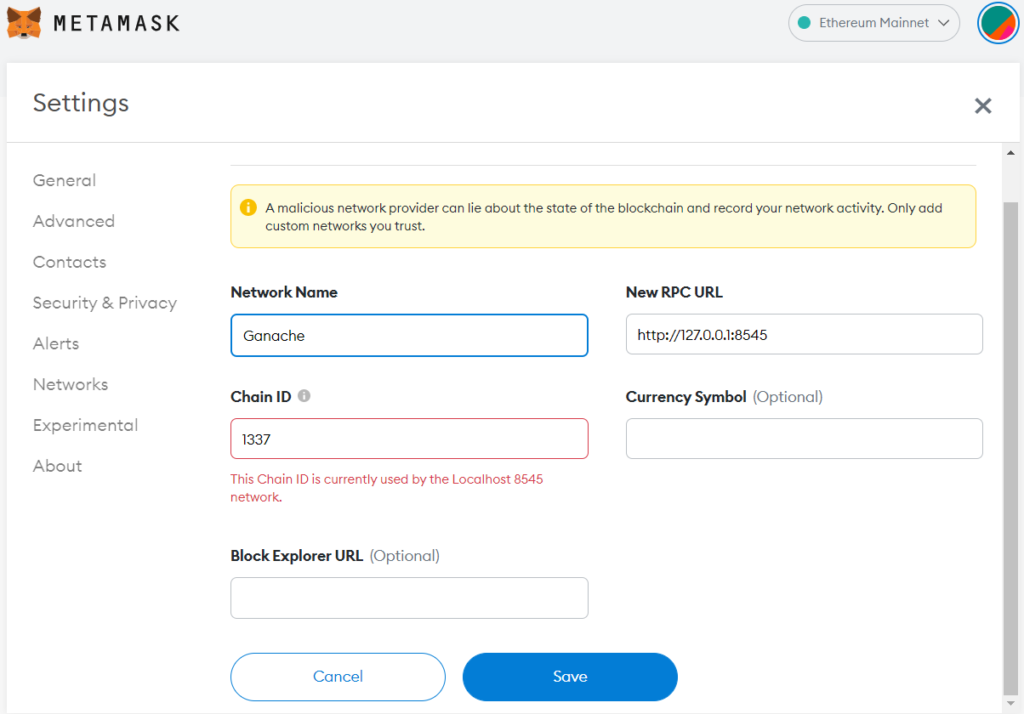
After saving, we will see this screen as shown below. Each account created by Ganache CLI is given 1000 ether. We will notice less ether as some gas was used when we deployed the contract and ran the tests.
Step 3: Running the DApp
Now it’s time to run our DApp. We will go to the second Terminal. This command will launch a new local web server and open a new browser tab with our DApp. Paste this command on the terminal.
npm run dev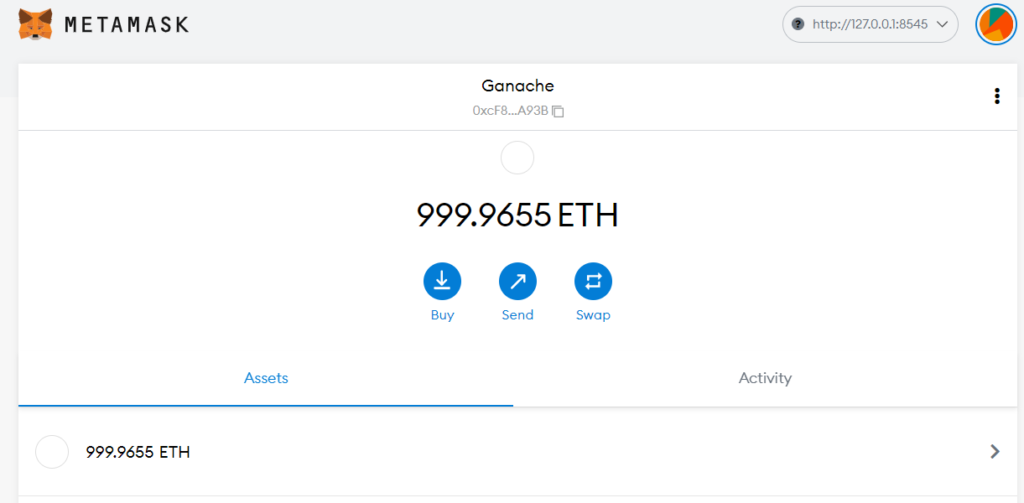
After running the above command, we will see the output as shown in the below image.

Step 4: Using the DApp
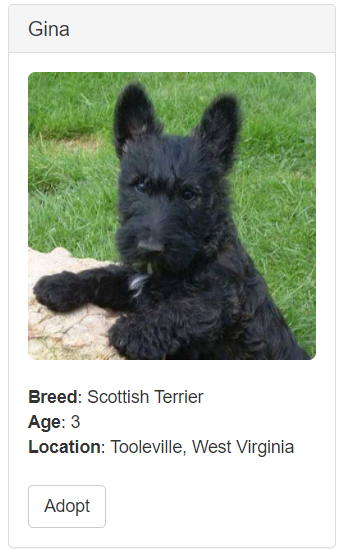
- Now, it’s time to use our DApp. We will adopt Gina. Click on the Adopt button.
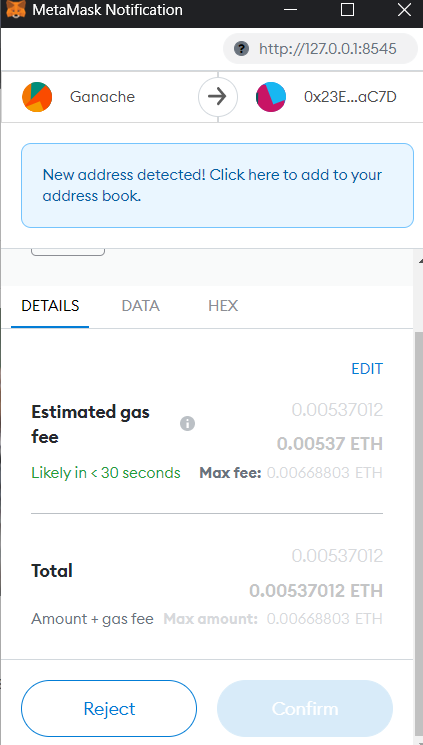
- A Metamask notification will pop-up and will see a transaction. Now, click on confirm.
- We will see a new notification for Confirmed Transaction.

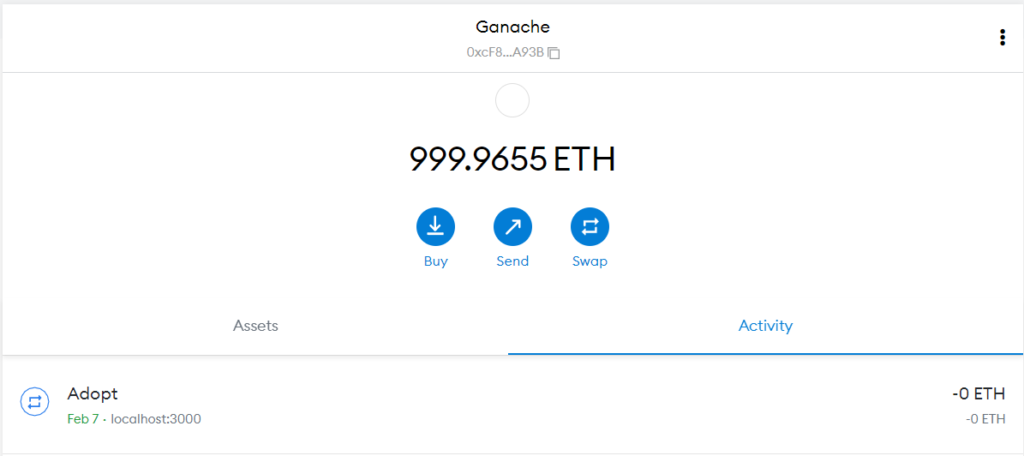
- Now, if we go back to the activity section of MetaMask wallet we can see a transaction.
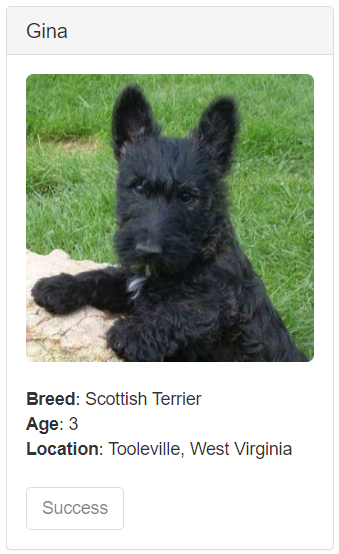
- If we go back to our DApp. We can see that the adopt button is now changed to success.
Conclusion
We have tried to explain everything from scratch in a step-by-step manner. We have given explanations and reasoning for every single step. We are happy for everyone who has read this article and has created this DApp from scratch with no prior DApp development experience. We will create a new exciting DApp from scratch in the next tutorial. All credits of code used belong to Truffle Documentation.
Frequently Asked Questions
What are some famous DApps?
CryptoMines, Bomb Crypto, Splinterlands and Axie Infinity are some popular DApps in the market.
How does DApp make money?
DApps can make money through an ICO launch, Advertisements, Transaction Fees, Subscriptions, etc., and much more.
Does DApps have a future?
DApps will continue to expand at an exponential rate in the future. Although this process will take time, 2022 is projected to see significant improvements and the spread of blockchain technology and its applications.
Why is Web3 the future?
Privacy is the biggest concern for regular users in 2022. In Web3, users will have complete ownership of their assets. Unlike now, where tech giants control most platforms.
Where can we find DApps?
We can find all popular DApps on DApp Radar. It is one of the best DApp stores available in the market.
Also read,

